What is a creative workflow management template?
A creative workflow management template guides the progression of creative projects. It provides a clear roadmap for tasks such as copywriting, design and video production, ensuring that work progresses smoothly from start to finish. Typically, the stages in a creative workflow include brainstorming, development, execution, review and final delivery.
This template offers a visual representation of a creative workflow, allowing teams to track and manage tasks effectively. With predefined workflows, team members have a shared understanding of the steps required to complete a project, eliminating ambiguity and building accountability.
A creative workflow management template is particularly useful for cross-functional teams, where multiple disciplines need to coordinate efforts. It’s a central source of truth for tracking task statuses, dependencies, responsibilities and timelines. This clarity helps keep team members informed and aligned, resulting in better project outcomes.
Why use a creative workflow management template?
Using a creative workflow management template empowers creative teams to work smarter and more efficiently.
Here’s why you should use one:
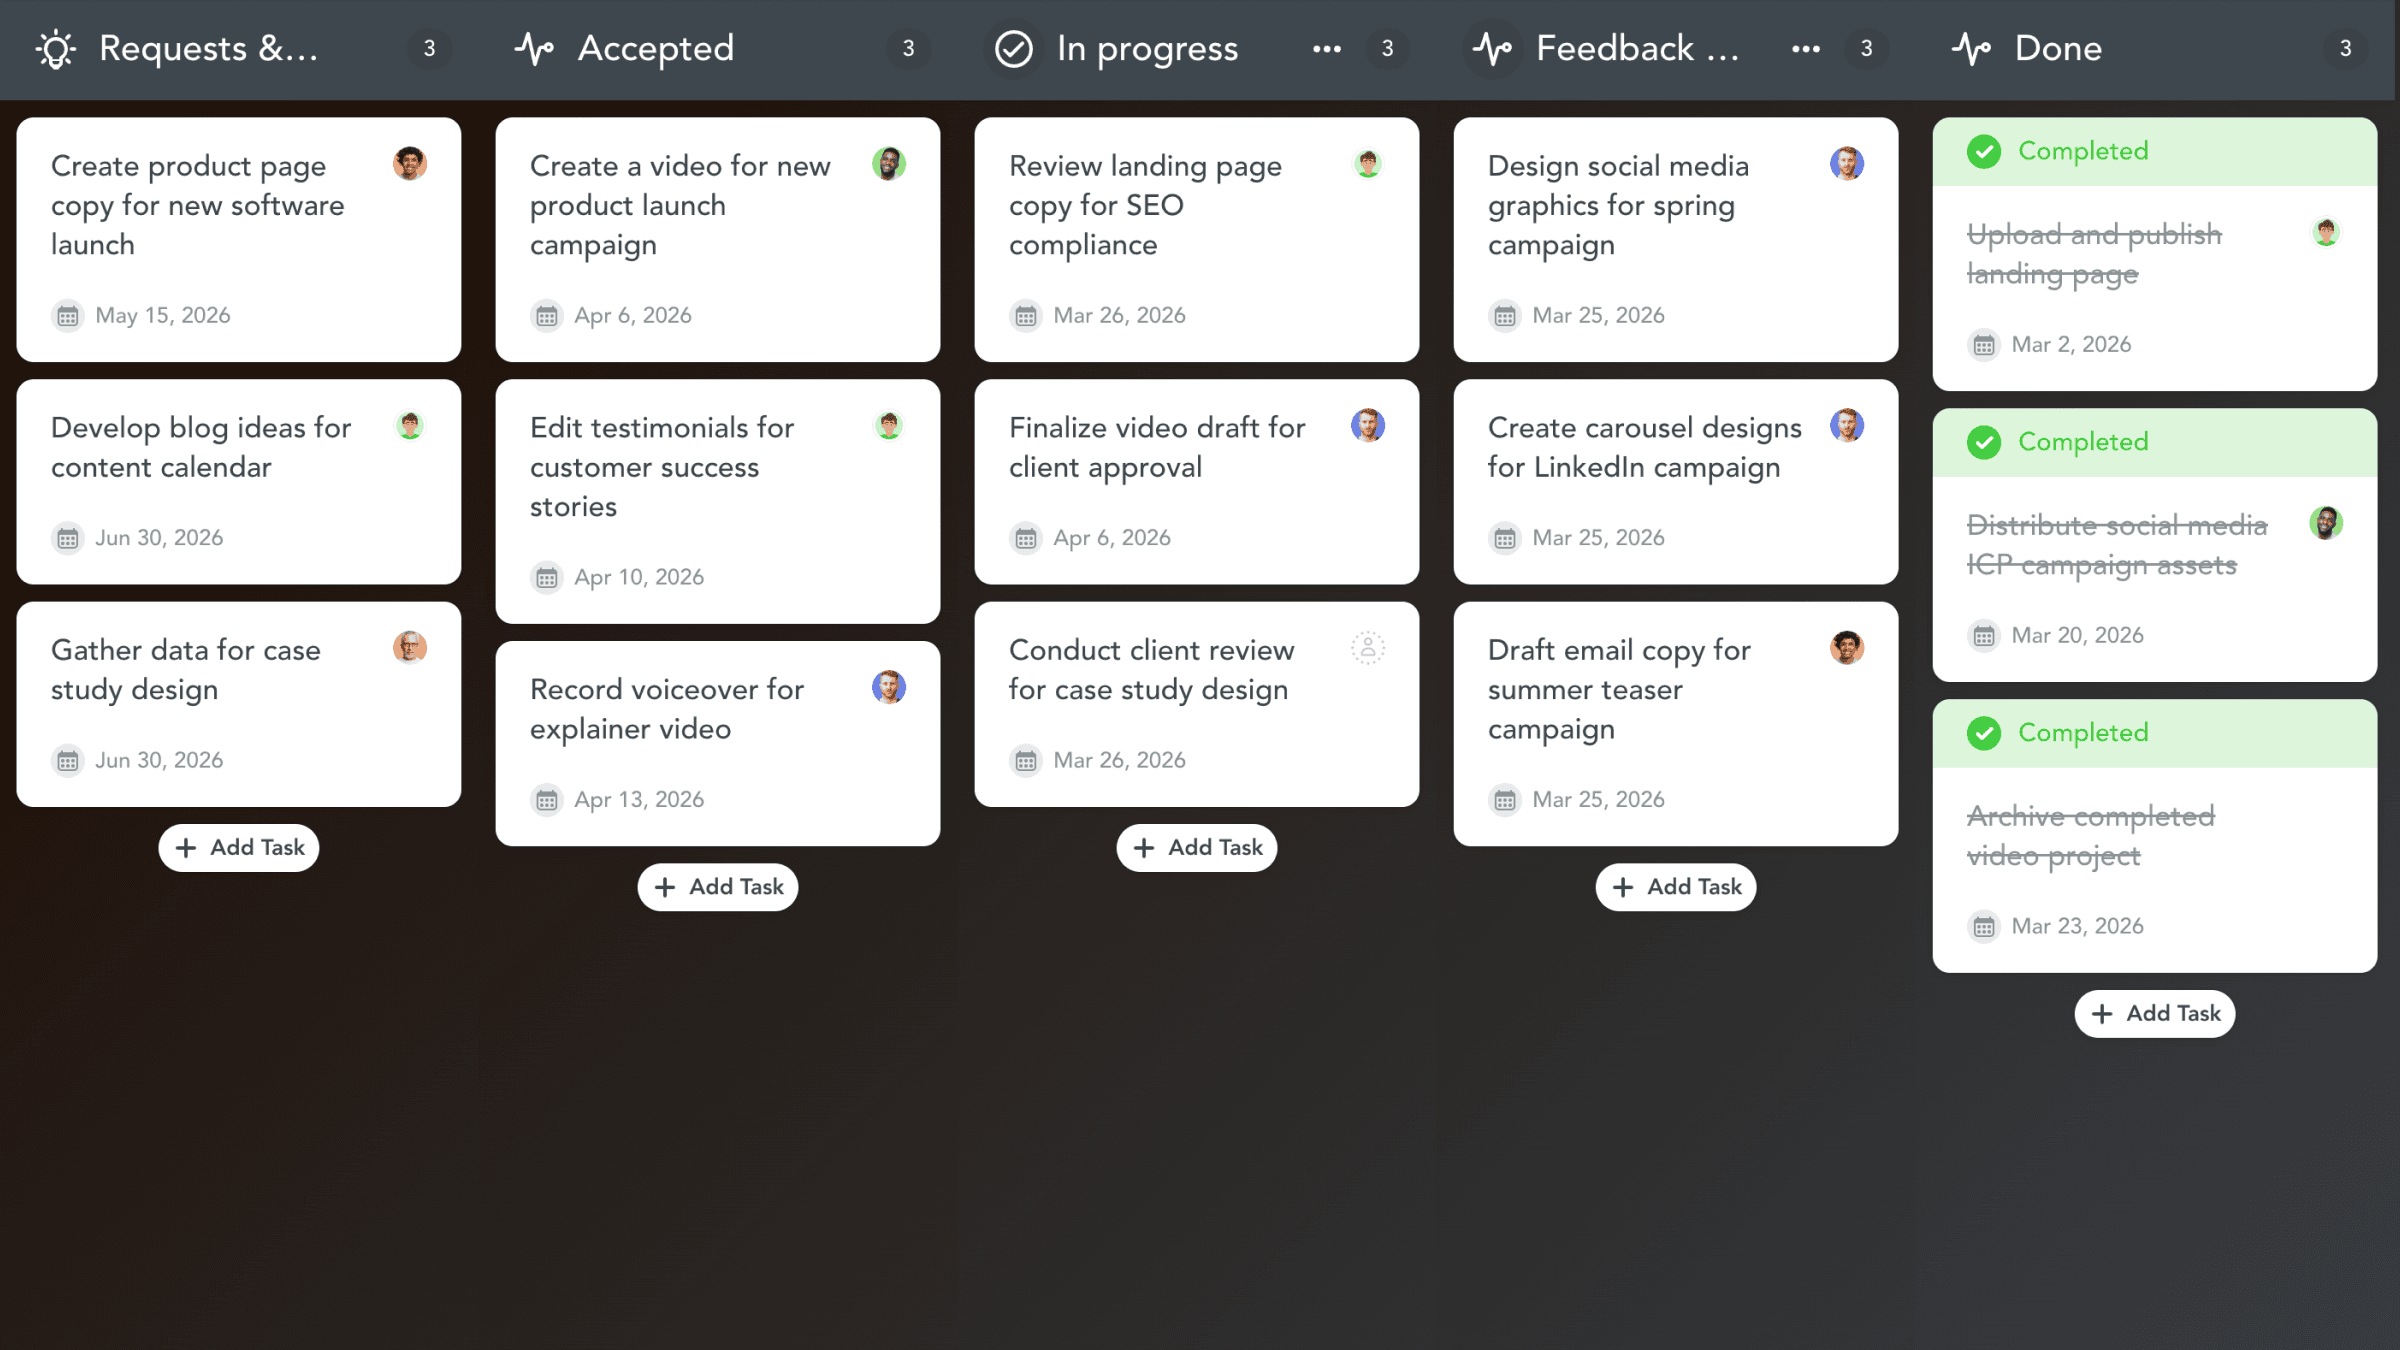
Maintain structure: Structure your board into stages like “Requests & ideas”, “Accepted”, “In progress”, “Feedback & QA” and “Done” to ensure consistency.
Promote team collaboration: Encourage strong communication among copywriters, designers and video editors with a shared, transparent workflow.
Simplify task delegation: Assign tasks with ease so every team member knows their role and responsibilities at a glance.
Enhance visibility: Monitor the status of tasks in real-time, so you’re never left wondering about project progress.
Incorporate feedback effortlessly: Use the “Feedback & QA” stage to refine deliverables and maintain quality standards.
Ensure due dates are met: Include realistic timelines directly into the workflow to keep projects on schedule.
Align with business goals: Tie creative outputs to strategic objectives, from product launches to campaigns or promotional effort.
This template transforms creative ideas into an organized, actionable plan. By using a workflow tailored to creative projects, your team can focus on producing exceptional work that meets deadlines and exceeds expectations.
When to use the creative workflow management template
The creative workflow management template is ideal for any project that requires coordination between creative disciplines like copywriting, design and video production. Whether you’re launching a new product, running a marketing campaign or producing a corporate video, this template ensures your team stays aligned and productive.
Use this template in the following example scenarios:
Product launches: Coordinate the creation of marketing assets like product descriptions, visuals and videos for a cohesive rollout.
Marketing campaigns: Streamline the production of campaign materials, from ad copy to promotional videos, for consistent branding and messaging.
Content creation: Manage blog posts, infographics and social media content with a clear workflow that tracks progress from brainstorming to publishing.
Video production: Organize storyboarding, filming, editing and final delivery stages to keep video projects on time and within scope.
Cross-functional collaboration: Provide the structure and transparency teams need to collaborate effectively, regardless of their area of expertise.
Recurring creative projects: By standardizing your workflow, you reduce setup time and ensure every task follows a proven process. This workflow template is your go-to whenever you need to turn creative ideas into high-quality deliverables.
How to use the template
Using the creative workflow management template is simple and intuitive.
Step one: Create tasks
Break your project into smaller, actionable tasks. For example, create tasks for writing copy, designing visuals or editing videos. We’ve left some examples, such as “Develop blog ideas for content calendar” and “Record voiceover for explainer video” for inspiration. Feel free to edit, remove or add new tasks. Once ready, assign your tasks to team members with clear due dates to keep everyone informed and accountable.
Step two: Add checklist items
Within each task, create checklist items. Checklists provide clarity and ensure nothing gets overlooked. For example, in “Create a video for new product launch campaign”, you’ll find a checklist including “Write the video script and create a storyboard for approval.” and “Schedule filming dates and book locations.”. Again, feel free to customize, edit, remove or add to checklists within tasks.
Step three: Track progress
Move tasks through the workflow stages as they’re completed using the drag-and-drop function. Our visual task board will provide a clear overview of your project’s progress in real-time.
Step four: Incorporate feedback
Use the “Feedback & QA” stage to gather input from certain team members or stakeholders. Add checklist items for revisions and ensure they’re ticked off before moving tasks to “Done” and marking the task as complete.