What are the benefits of capacity planning?
The goal of capacity planning is to forecast whether your existing team resources can efficiently achieve the project objective(s). Your job as a project manager is to:
Predict the project expectations and plan accordingly
Ensure your workforce has the right resources to complete the workload
Identify any bottlenecks in the project requirements that will prevent desired outcomes
Creating a capacity plan allows you to lay out the full project requirements for both stakeholders and team members. Your team members can then:
Take the lead on project tasks that best complement their skills
Estimate their capacities to complete tasks in the assigned timelines
Collaborate with other teammates on complex tasks and reduce bottlenecks
Project capacity planning presents a realistic view of requirements to complete a large project. Using the capacity planning template, you can make the most efficient use of your budgets, your resources, and your team members’ time.
When to use the capacity planning template?
The capacity planning template allows you to:
Visualize workflows with each section representing part of a process
Impose limits to protect workers from overextending themselves
Estimate capacity so that you assign the proper budget and resources
The capacity planning template is an organizational tool that gives project managers the confidence to set realistic project deadlines. Suppose you work in a warehouse for a large manufacturing company. A client has just ordered a full shipment of new widgets, and your team has been tasked with assembling and testing the quality of those widgets.
Your job as a project manager is to ensure the client is satisfied with the delivery. Therefore, you should use the capacity planning template to:
Set the project schedule, working back from the final delivery deadline
Manage WIP limits by estimating workforce capacity
Set realistic task deadlines using historic data and considering task dependencies
Conduct daily standups to review progress and address blockers
By using the capacity planning template, you have a visual overview of all project workflows. You can easily identify any bottlenecks that slow down progress and adjust the project deadlines based on your team’s WIP capacity.
The template also makes it easy to provide status updates to clients if the project is proceeding as scheduled or if any changes to the delivery date need to be made. Use the capacity planning template as your single source of truth so that you can provide more transparent client communications.
How to use the capacity planning template
The capacity planning template is similar to a project resource planning template in that it allows you to organize your project and assign the appropriate resources to complete the scheduled work.
Remember that your template is meant to list out all timelines, resources and budgets related to a project. Be as specific as you can be when listing all the tasks necessary to complete the project by the proposed deadline.
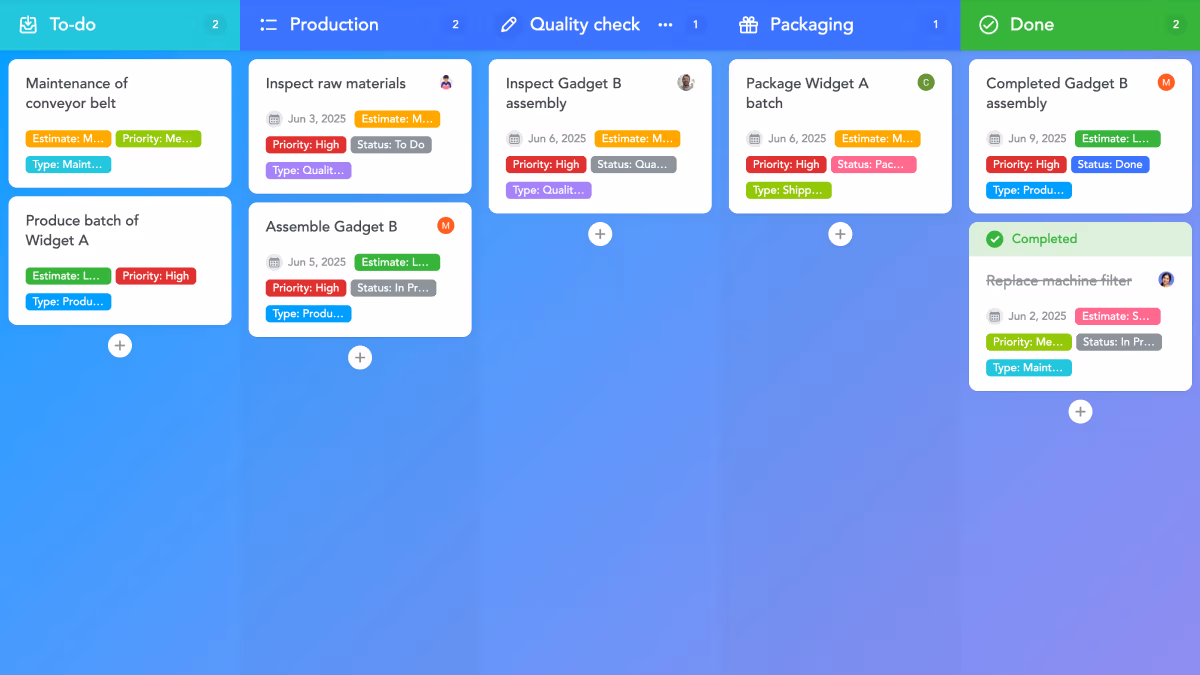
Step 1: Map out the project workflow
Begin by adapting the vertical sections in your template to map out your specific project workflow. Assign whatever labels to the sections best suit your unique needs, but keep in mind this isn’t a traditional Kanban board where tasks move from left to right as work progresses. Each section should be used for a specific type of task or part of the process. In the case of a factory production line, this would be production, quality check or packaging. When a task within a section is complete, you can simply drag and drop the Task to “Done’.
Step 2: Break down the workload into tasks
Now you’re ready to break down the project into tasks. At a manufacturing assembly plant, these tasks might include examples like performing routine maintenance on the conveyor belt, or assembling manufactured parts into finalized widgets.
You can create a new task by clicking the + in any board section. Be sure to add a detailed description of the expectations and assign a tag so that the assignee understands the task scope.
Step 3: Estimate work item size
This is where you can begin prioritizing the workload based on degree of difficulty and order of priority. The template supports relative work estimation techniques that organizes work into small, medium, or large deliverables. Choose a preset tag, which you can access in the right sidebar of your task, to indicate how much work will be required.
Step 4: Assign task start and end dates
Once your tasks are listed out on the template, you need to assign dates of delivery so that your team can manage their productivity. It’s crucial to consider task dependencies here. For example, in the template, the task “Assembly of Gadget B” naturally has to happen before “Inspect Gadget B assembly” and so it has an earlier due date.For a visualized timeline of the entire project, click the timeline icon in the top navigation bar and select “Show project timeline”. You can see which tasks are dependent on others and reassign resources as needed to keep the project on track for the final deadline.
Step 5: Monitor workforce capacity
As tasks are completed, some team members may have additional bandwidth to help reduce bottlenecks in other areas of the project. Use the Reports feature of your capacity planning template to monitor completion dates and task outputs.


